Install SSL Certificate on Google App Engine

1 Star2 Stars3 Stars4 Stars5 Stars (12 votes, average: 4.67 out of 5)
Loading...

Here’s a quick guide to installing SSL on Google App Engine

Google App Engine (GAE) is a wonderful cloud platform to host, build and run applications using Google’s data centers. If you use Google App Engine (GAE), you don’t have to manage the server, you only need to upload the application. Any developer who is serious about his/her App security would want to install an SSL certificate at some point. That is why we have come up with this easy guide that will help you install SSL on Google App Engine.

SSL on Google App Engine

Note: You must make sure that the certificate you want to install is supported by GAE.

Let’s get the ball rolling.

1. Generate a certificate signing request (CSR)

Whether you want to install SSL on a website or on App, CSR generation is the first thing you need to do. Once you generate a CSR, you will be given CSR along with your private key. You can either opt for our CSR Generation tool or you can generate one over a web server.

Note: It is called ‘Private’ Key for a reason. Make sure you store it in a secured place. After all, it’s your website at stake here.

2. Download and extract the certificate files

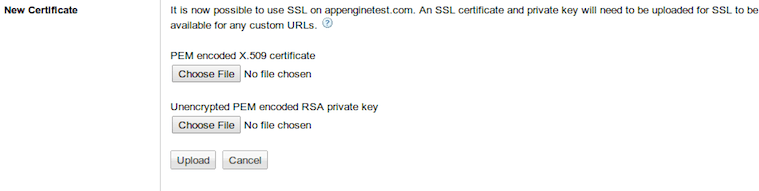
Once you are done with the vetting process, your CA will send you the certificate files via email. These files might be compressed in .zip format, if they are you can extract those files to the server directory.

You will also need to configure SSL for custom domains using your Google Apps account.

3. Convert the certificate to .pem format

  • Open any text editor and copy the certificate details and paste it in the order below:
    • Primary certificate: domain_name.crt
    • Intermediate certificate: certificate_provider.crt
      It should be like this:


      —–BEGIN CERTIFICATE—–
      
      (Your Primary SSL certificate: domain_name.crt)
      
      —–END CERTIFICATE—–
      
      —–BEGIN CERTIFICATE—–
      
      (Your Intermediate certificate: certificate_provider.crt)
      
      —–END CERTIFICATE—–
      

      Those “BEGIN CERTIFICATE” and “END CERTIFICATE” marks are a MUST. Don’t forget to include them.

  • Save the file with the .pem format.

And if you don’t want your brain cells to indulge in this process, use our automated SSL converter tool for it.

4. Activate the SSL Certificate for Custom Domain

Note: If your app has already been added in Google Apps, you can skip the first two steps and move directly to the third step.

  • Log in to your Google Apps Account.
  • Go to More Controls > App engine Apps > Add Service. Now enter your application ID, click on Add it now button, accept the terms of agreement & hit the Activate
  • Now connect your App with Google Apps & Map it with a sub domain. You’ll see your app URL. And if you wish to give access to the primary domain using Google Apps account, click on the Add new URL button.
  • Click on Enable SSL for App Engine Applications and then go to Security > Advance Settings > Show More > SSL for Customer Domains. Enter Application ID to activate your SSL.

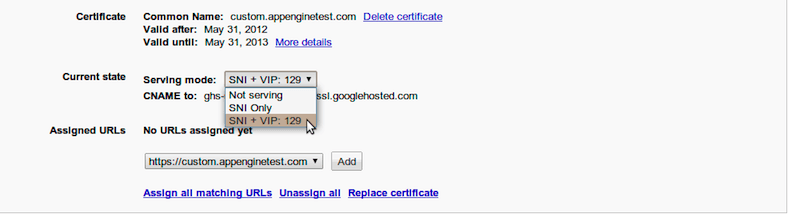
Once all the aforementioned steps are completed successfully, you’ll be redirected to App Engine Admin Console of the application.

5. Upload your certificate

  • Log into the Google Admin console.
  • Go to Security > Advanced Settings > Show More (optional) > SSL for Custom Domains.
  • Select Configure SSL Certificates to go to SSL configuration page.
  • Now click on Upload a new certificate button.
Add SSL on Google App Engine
  • Upload your private key and .pem files.

6. Configure your certificate

Now that you have uploaded the certificate files, you must configure them. Here’s how to do it:

  • Select Serving mode option in Current State.
Selection of serving Mode
  • Choose the serving mode based on your server type.
  • Once you’ve selected your server type, you must assign the URL(s). You can add multiple URLs using Add button or using the Assign all matching URLs option.

Put a nail in the coffin

  • Now that you’ve successfully configured the certificate, you must change the CNAME details of URL. Sadly, we can’t help you here. You must contact your DNS provider for that. Click here for further guidance.
  • Click on the Save button and voila! Your SSL certificate is successfully installed.