

 (29 votes, average: 2.31 out of 5)
Higher Trust = More Sales
(29 votes, average: 2.31 out of 5)Sometimes an SSL installation procedure can go totally wrong leaving you in a complete mess. All lost and confused with no clue how to proceed. That is exactly the reason why a detailed step-wise guide is so important when it comes to installing an SSL certificate on a server.
You’ll need to purchase an SSL certificate before you start the install process. If you don’t already have a certificate, you can find the best one for your needs here.Compare SSL Certificates
Here are step-by-step guides for installing SSL certificates on Windows Server 2012 – IIS 8, Windows Server 2012 R2 – IIS 8.5, & Windows Server R2 – IIS 10 – Single certificate & multiple certificates using SNI.
You need to have a CSR generated before you begin with the SSL installation. Click here to know how you can generate a CSR for IIS 8, 8.5 & 10. You can jump to the installation if you have generated CSR.
Step 1
Firstly, open a zip file that contains your certificate and save the file named ‘your_domain_name.cer’ to the desktop of the web server you intend to secure.
Step 2
From the Start screen, click or search for Internet Information Services (IIS) Manager. Open it.
Step 3
Now click on the ‘Server Name’.
Step 4
As shown in Figure A, from the center menu, double click on ‘Server Certificates’ button in the IIS section (located in the middle of the menu).

Figure A
Step 5
As per Figure B, from the Actions menu on the right, click on ‘Complete Certificate Request…’ This action will open the Complete Certificate Request wizard.
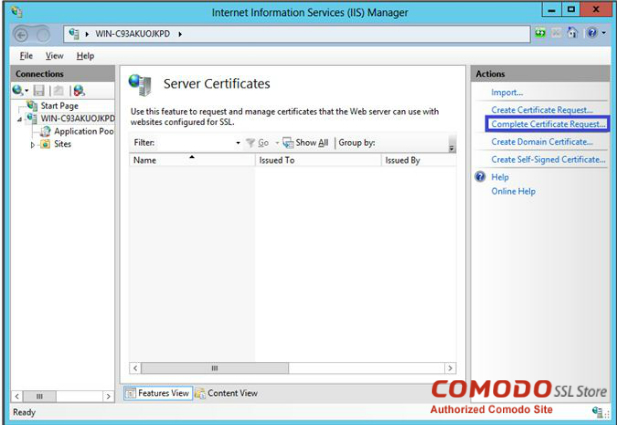
Figure B
Step 6
Browse your_domain_name.cer file from Step 1. Now enter a friendly name. This name should not be a part of the certificate itself. It is used by the server administrator to easily differentiate the certificate. After that, choose to place this new certificate in the Personal certificate store as shown below in Figure C.
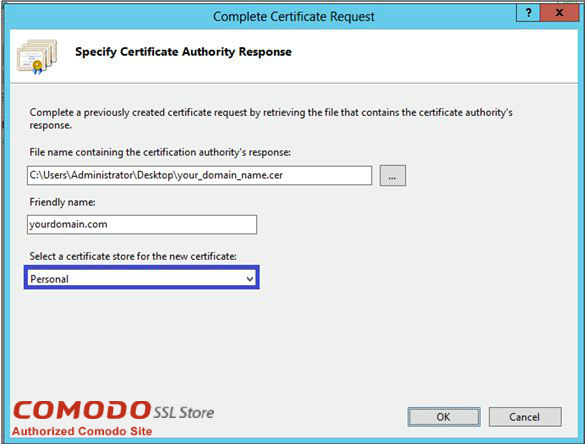
Figure C
Step 7
Click ‘OK’ to proceed. This will install the certificate to the server.
Step 8
After the successful installation of the SSL certificate to the server, that certificate needs to be assigned to an appropriate website which uses IIS.
Step 9
Go to the main window of Internet Information Services (IIS) manager. From ‘Connections’ menu, select the name of the server for which the certificate was installed.
Step 10
From the option ‘Sites’, select the site that is to be secured with an SSL certificate.
Step 11
As shown in Figure D, click on ‘Bindings…’ from the ‘Actions’ menu. This will lead to a new window called ‘Site Bindings’.
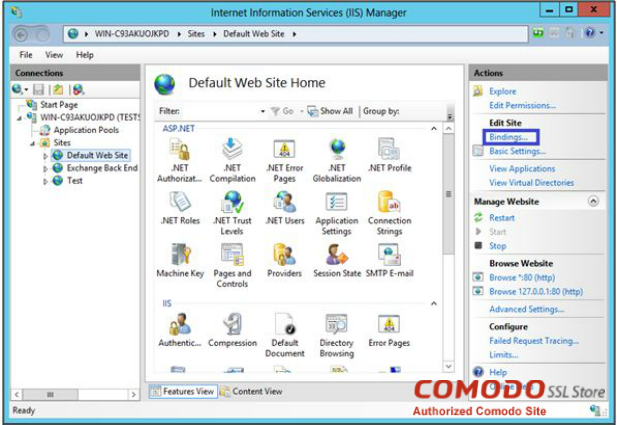
Figure D
Step 12
From the new window ‘Site Bindings’, click on ‘Add…’ This will open a new window of ‘Add Site Bindings’. Refer Figure E.
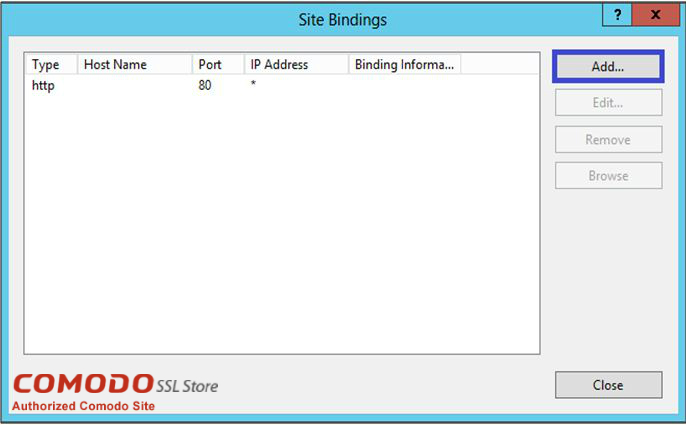
Figure E
Step 13
Choose ‘https’ from the dropdown menu of ‘Type’. The space for IP address should be the IP address of the site or ‘All Unassigned’ option should be selected. The ‘Port’ should have a ‘443’ in it, which usually is the port over which traffic will be secured and the field of ‘SSL Certificate’ should specify the certificate installed in Step. 7. See Figure F
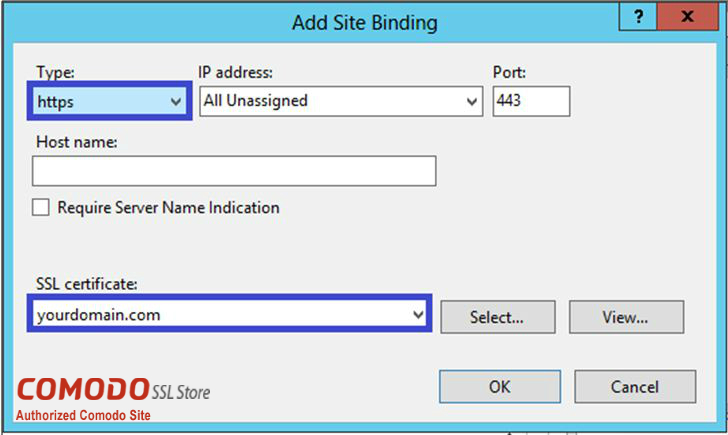
Figure F
Step 14
Click ‘OK’ to continue.
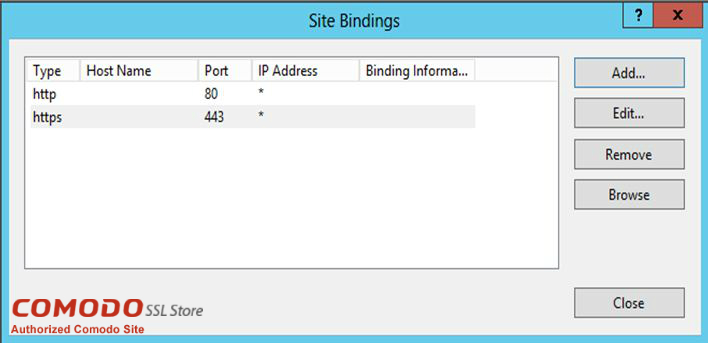
Figure G
Step 15
With that, your first SSL certificate is now installed, and the website is configured as well to accept secure connections.
We’ll now quickly move on to a guide of installing multiple certificates using Server Name Identification (SNI).
Server Name Identification (SNI) can be said as an extension to the TLS protocol that indicates which host-name the client is attempting to connect during the ‘handshake’ process. This lets the server present multiple certificates on the same IP address and port number and thus allow multiple secure websites (https) to be served under the same IP address with no need for all those sites to use the same certificate.
Here is a step-wise guide on installing an SSL certificate:
Step 1
Firstly, open a zip file that contains your certificate and save the file named ‘your_domain_name.cer’ to the desktop of the web server you intend to secure.
Step 2
From the Start screen, click or search for Internet Information Services (IIS) Manager. Open it.
Step 3
Now click on the ‘Server Name’.
Step 4
As shown in Figure A, from the center menu, double click on ‘Server Certificates’ button in the IIS section (located in the middle of the menu).
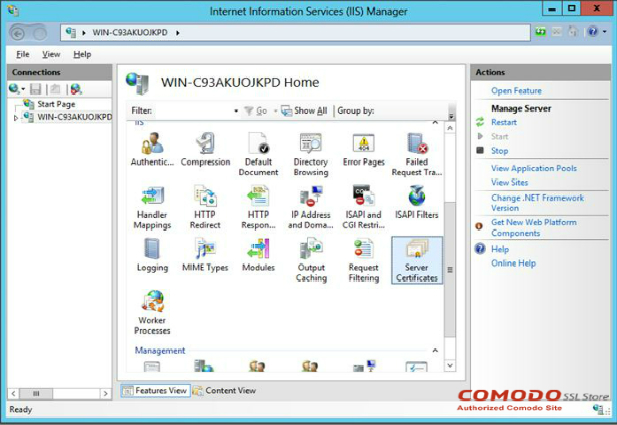
Figure A
Step 5
As per Figure B, from the Actions menu on the right, click on ‘Complete Certificate Request…’ This action will open the Complete Certificate Request wizard.
Figure B
Step 6
Browse your_domain_name.cer file from Step 1. Now enter a friendly name. This name should not be a part of the certificate itself. It is used by the server administrator to easily differentiate the certificate. After that, choose to place this new certificate in the Web Hosting certificate store as shown below in Figure C.
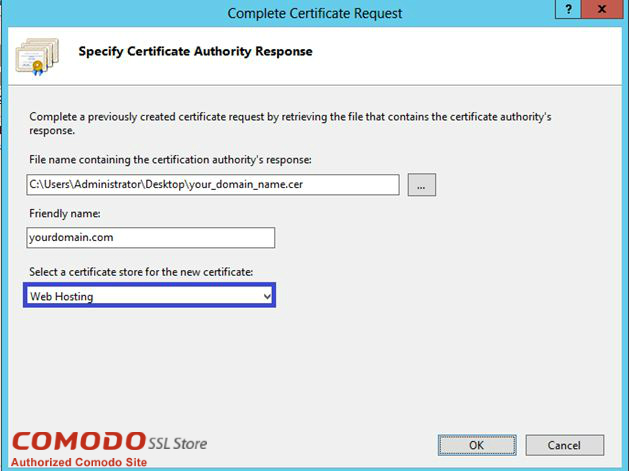
Figure C
Step 7
Click ‘OK’ to proceed. This will install the certificate to the server.
Please Note that IIS 8 tends to come up with an error message ’Failed to remove the certificate’. If it is the same server that you generated a CSR for, then mostly the certificate is already installed. In that case, simply cancel the error window and refresh the list of server certificates by pressing F5. If the new certificate is on the list, ensure that the certificate is in the Web Hosting certificate store. If the name is not on the list, you will have to re-issue your certificate using a new CSR.
Step 8
After the successful installation of the SSL certificate to the server, that certificate needs to be assigned to an appropriate website which uses IIS.
Step 9
Go to the main window of Internet Information Services (IIS) manager. From ‘Connections’ menu, select the name of the server for which the certificate was installed.
Step 10
From the option ‘Sites’, select the site that is to be secured with an SSL certificate.
Step 11
As shown in the Figure D, click on ‘Bindings…’ from the Actions’ menu. This will lead to a new window called ‘Site Bindings’.
Figure D
Step 12
From the new window ‘Site Bindings’, click on ‘Add…’ This will open a new window of ‘Add Site Bindings’. Refer Figure E.
Figure E
Step 13
Choose ‘https’ from the dropdown menu of ‘Type’. The space for IP address should be the IP address of the site or ‘All Unassigned’ option should be selected. The ‘Port’ should have a ‘443’ in it, which usually is the port over which traffic will be secured and the field of ‘SSL Certificate’ should specify the certificate installed in Step. 7. See Figure F
Figure F
Step 14
Click ‘OK’ to continue.
Figure G
Step 15
With that, your first SSL certificate is now installed, and the website is configured as well to accept secure connections.
Step 16
You need to repeat the steps for creating a CSR for second site.
Step 17
Install the certificate file as mentioned in the above steps. (Till step 12.)
Step 18
Choose https under ‘Type’ field and select IP address of the site or select ‘All Unassigned’. The port over which the traffic will be secured by SSL is generally 443. Now, enter the host name to be secured and click on the checkbox ‘Require Server Name Identification’
Please Note this step is required only for the additional sites and NOT for the primary site as shown in Step 13.
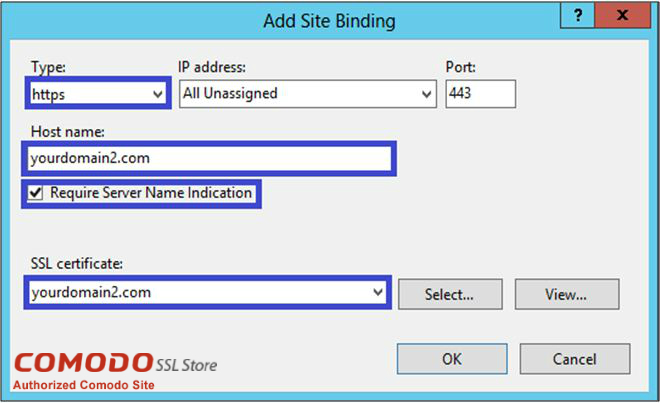
Figure H
Step 19
Proceed by clicking ‘OK’.
Step 20
With this your second SSL is successfully installed and the website is configured to accept secure connections.
Step 21
For setting up any additional sites, please follow Step 16-Step 19.
1. Check your SSL certificate on your web server by SSL checker tool to make sure it is correctly installed.
SSL Checker Tool: https://comodosslstore.com/ssltools/ssl-checker.php
