
 (9 votes, average: 4.56 out of 5)
Higher Trust = More Sales
(9 votes, average: 4.56 out of 5)It’s 2017, which means that by the end of this year the browsers will have effectively made SSL mandatory.
That’s right, 2017 is the year of SSL.
For the past year or so the browsers have been pushing the internet towards universal encryption. It started with subtle initiatives that incentivized the decision to add SSL—like giving an SEO rankings boost to encrypted sites and making advanced browser features exclusively available.
In 2017 the browser community will stop suggesting and start demanding. First, unencrypted sites will get negative visual indicators. Then the browsers will begin warning about connection safety. This will impact traffic and force many site owners to add SSL to avoid the weight of the penalties for not encrypting.
SSL or Secure Socket Layers, is a mechanism for encrypting communication between web servers and clients (visitors). An SSL Certificate does two things, it facilitates encryption via the SSL protocol (or more accurately, the TLS protocol—colloquially it is known as SSL) while also authenticating the identity of the web server.
For the sake of this article, we won’t focus on the authentication aspect too much. Rather, we’ll look at the encryption side of things. The internet was built on HTTP, which stands for Hypertext Transfer Protocol—the communication protocol that allows browsers to communicate with the websites they visit.
When you install SSL you serve your website over HTTPS. This is the secured version of HTTP. It ensures that no one – no third-party – can listen in on your connections. That means that any data transmitted is secure, which is essential for any site the collects personal information or conducts financial transactions.
When a browser arrives at a site with SSL, it runs a series of checks to ensure the SSL Certificate is valid and authentic and then negotiates with the server to establish an encrypted connection. During the encrypted connection, all communication is scrambled in such a way that only the party on the other end of the connection can unscramble it.
That’s encryption in a nutshell.
You’ll need to purchase an SSL certificate before you start the install process. If you don’t already have a certificate, you can find the best one for your needs here.Compare SSL Certificates
Installing an SSL Certificate on WordPress is actually a fairly simple task, but let’s get something straight before we go any further: you’re not really installing it on WordPress so much as optimizing your settings so WordPress will make use of it. SSL Certificates aren’t installed on websites—they’re installed on the servers that host the website.
That can get a bit confusing so we figured we’d clear it up.
Now, the first thing you’ll need to do is purchase or obtain SSL. We’re going to assume you’ve already done that, gotten your certificate issued and installed it, along with your private key and any intermediate certificates on your web server. If it’s possible, contact your web hosting provider or have your IT guy install the certificate for you.
Or, if you need help installing it, we have plenty of guides on how to install SSL on various server types.
Once it’s installed on the physical server, then you can begin setting up your WordPress site to make use of it.
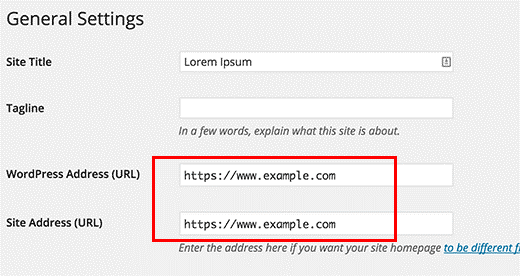
The first thing you’ll need to do is alter your URL, changing it from HTTP to HTTPS. This can be done by going to the Settings in your dashboard (under General) and updating the address fields.
Now, if you’re adding SSL to a website that already exists, you need to pay special attention to the next step. You’re going to have to redirect all of your existing pages from HTTP to HTTPS.
This is a step that a lot of site owners mess up and it will instantly crater your SEO rankings if you do it the wrong way.
In order to redirect your existing pages and assets to HTTPS, you need to update your .htaccess file with the following:
1. <IfModule mod_rewrite.c>
2. RewriteEngine On
3. RewriteCond %{SERVER_PORT} 80
4. RewriteRule ^(.*)$ https://www.yoursite.com/$1 [R,L]
5. </IfModule>
Or, for nginx servers:
1. server {
2. listen 80;
3. server_name yoursite.com www.yoursite.com;
4. return 301 https://yoursite.com$request_uri;
5. }
And voila! Your WordPress site is now SSL enabled and should be served entirely over HTTPS. Say goodbye to negative visual indicators and browser warnings and hello to connection security.
For real though, encrypting was the right move. If you have any questions or concerns, feel free to contact our Customer Experience Department by phone or online chat—representatives are available 24/7.
WordPress Resources:
