Rate this article: 
 (6 votes, average: 4.00)
(6 votes, average: 4.00) (6 votes, average: 4.00)With Google pushing all websites to switch to HTTPS, many website owners are making the jump to add HTTPS to WordPress. Here’s how to make the switch to HTTPS, step-by-step.
There’s very little barrier to entry when it comes to HTTPS. All you really need is an SSL certificate and about ten minutes. An SSL (aka Secure Sockets Layer) certificate is a piece of software that facilitates https encryption, and – depending on the level validation – can authenticate a server. When you install an SSL certificate you can begin serving your website over HTTPS instead of the standard and unsecure HTTP. HTTPS connections are encrypted, meaning that the data transmitted between a website and its users is secure- unreadable by anyone but the intended recipient.
In the past SSL was seen as a product that only certain kinds of websites needed, namely the ones that collected personal data and financial information. Starting in July of 2018 though, Google will require every website to have a working SSL certificate installed and to have their websites running over HTTPS.
There are a lot of different types of SSL certificates, and it can be confusing at first. Let’s narrow it down:
Tip for getting lowest price: Buy direct, not through your web host. Take a look at our range of SSL certificates, and remember if you find it cheaper somewhere else we’ll beat the price.
Once you’ve purchased your SSL certificate you’ll need to:
We have a range of guides showing you how to install SSL certificates on all the most popular servers. Take a look at the links above, we probably have you covered.
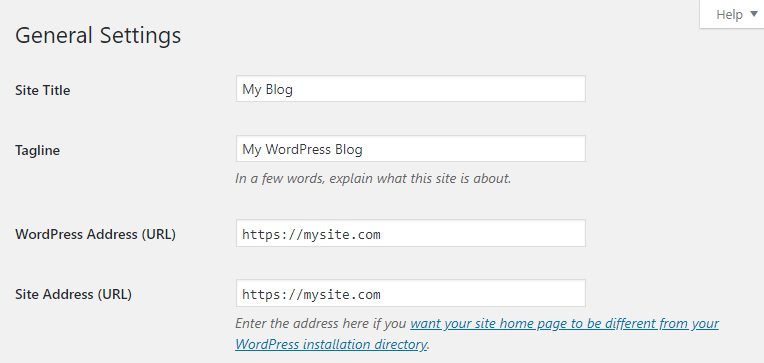
The next step in how to add HTTPS to WordPress is to update your WordPress configuration. The first thing you’re going to want to do is update your site’s URL.
To do this, you’re going to click on “Settings” in the dashboard and then “General.” On this Settings > General page, you should see the fields that let you change your URL. Remember, you’re only changing “http://” to “https://”.
Now you’re going to need to set up redirects for your existing content. This ensures that users and search engines access your website via the correct HTTPS url. To do that you’re going to need to add the following code to your .htaccess file:
RewriteEngine On
RewriteCond %{HTTP_HOST} ^mydomain\.com [NC]
RewriteCond %{SERVER_PORT} 80
RewriteRule ^(.*)$ https://www.mydomain.com/$1 [R,L]
If you’re using Nginx, use this code instead:
server {
	listen 80 default_server;
	listen [::]:80 default_server;
	server_name mysite.com www.mysite.com;
	return 301 https://$server_name$request_uri;
}
Of course, with each code snippet, you’ll need to replace mysite.com with your actual domain name.
Your WordPress site should now have working HTTPS!
There are still a few other little tweaks you can make in certain secanrios, such as forcing HTTPS on WordPress Admin urls. If you want to add HTTPS to your WordPress multi-site admin area or login pages, you’re going to need to update your wp-config.php file. Add the code below right above the line that says “that’s all, stop editing!”:
define('FORCE_SSL_ADMIN', true);
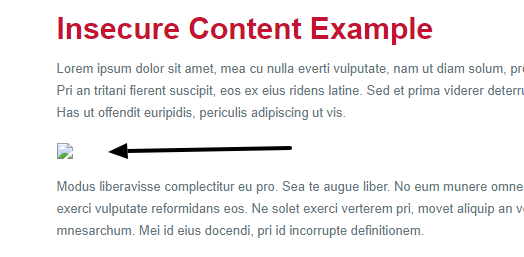
If your website directly references content (such as images or CSS stylesheets) using an HTTP url, the content will be blocked once you switch to HTTPS. If you have an image inserted using an HTTP src URL, you’ll see something like this:
If your CSS stylesheet is called using an HTTP url, it can break your entire page’s look at feel, like this:

There are a variety of reasons your content could be referenced via HTTP, including:
How do you fix insecure content (mixed content) references after you add HTTPS to WordPress? The best way to fix this issue is to manually update each HTTP reference:
If you’d prefer an even easier option, just install a WordPress SSL plugin like SSL Insecure Content Fixer – this will usually handle all HTTP to HTTPS WordPress issues. The drawback is that you haven’t permanently changed your site, so you’ll always need that plugin to keep your site working.
Most of us rely heavily on Google to send us new website visitors, so it’s important to maintain Google rankings for our WordPress sites after adding HTTPS. Here are a few quick tips:
Keep in mind that:
For more details, see our article on Maintaining Your SEO Rankings When Migrating to HTTPS.
That’s it! You now know how to add HTTPS to WordPress! May the force (of encryption) be with you!
While there is a way to add HTTPS to WordPress just on individual pages, you won’t find it here. That’s because best practice is to set up HTTPS Everywhere, meaning that every page is encrypted. Piecemeal encryption opens up attack vectors and is generally ill-advised. Because we want to promote encryption best practices, we recommend you install SSL on your entire website rather than picking and choosing whether to encrypt pages one at a time.

Tip: you can get the lowest price on SSL certificates when you buy direct instead of through your hosting company.
Compare SSL Certificates
