Rate this article: 

 (4 votes, average: 3.50)
(4 votes, average: 3.50) (4 votes, average: 3.50)Let’s talk about how to redirect HTTP to HTTPS on your WordPress site. After all, July 2018 is the deadline for websites to install SSL and start being served via HTTPS, lest site owners want their users to receive a browser warning about continuing to use your site.
So, before we get started, let’s assume you’ve already purchased SSL, gone through validation, gotten your certificate issued and installed it on your server. Also, we highly recommend backing up your website, just in case. If you haven’t, check one of our other guides and come back when you’re ready. If you need an SSL certificate, you can find the lowest prices on our website:

Tip: You can typically save a significant amount by buying your SSL certificate direct instead of through your web hosting company. We sell all Comodo SSL certificates at up to 75% off.
Compare SSL Certificates
Also, it’s worth noting that it’s probably best practice to migrate to HTTPS at the server level. But, if that’s too complicated or you don’t have server access, it can be done at the site level using the back-end of WordPress.
Even if your website isn’t collecting any personal data at all, you should still add HTTPS to your admin panel, lest someone steal your credentials and with them, your website.
So, to redirect HTTP to HTTPS for your Admin area, open wp-config.php in the WordPress root directory. Now, scroll down to the bottom and right before it says, “That’s all, stop editing!,” add the following line:
define('FORCE_SSL_ADMIN', true);
Now, to test whether it worked you’ll need to try to connect with your admin area using https:// at the beginning of the URL. If your browser makes a secure connection you’ve accomplished step one.
Now that you’ve got your admin area locked down, it’s time to update your website’s address. To do this you’re going to need to hover over your Settings button in the dashboard and then selecting “General.”
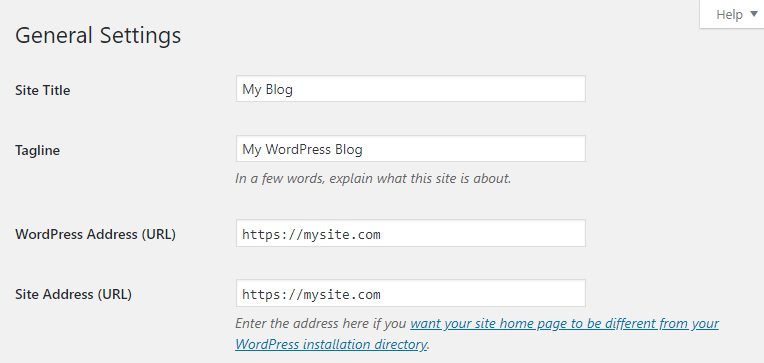
This is a pretty simple step. You should see two URLs, one is your WordPress address and the other is your site address. Replace the http:// with https:// at the beginning of both URLs. Remember, you want httpS. That one tiny letter is absolutely crucial.
This part can be really long and arduous depending on the size of your website. While you can often get away with just redirecting HTTP to HTTPS, it’s important to manually change as many references as you can. This will help your Google rankings and remove insecure content warnings.
Now, there are third-party plugins that can be used, and generally they work like they’re supposed to. But they can also mess up your website so if you plan on trying one out, make sure you back everything up.
Regardless of whether you do it yourself or have a plugin attempt to, if your links are absolute (sometimes called hard-coded) you’re going to need to change their protocol from HTTP to HTTPS by updating each one. This includes internal and external links. Now, if you’re using relative links, you should be OK. If not, make sure to update URLs for:
Again, you might want to think about using relative links (using // instead of https://) to avoid issues in the future.
When you change protocols from HTTP to HTTPS, you’re not really migrating the existing url, you’re creating a new one and telling the browser to connect to that. Those old HTTP pages can still be accessed unless you’re using 301s (and we also recommend setting up HSTS). So, let’s edit the .htaccess file to set up our 301 redirects.
To do this we’re going to start by opening the .htaccess file in the root directory, once again, scroll to the bottom and right below where you updated it to add HTTPS to your admin area, you’re going to insert the following code:
RewriteEngine On

RewriteCond %{HTTPS} off

RewriteRule ^(.*)$ https://%{HTTP_HOST}%{REQUEST_URI} [L,R=301]
Wonderful! From now on, users should be making their connections to your site via HTTPS. Remember, if you fail to do this, your site will be less secure and Google is going to dock you for duplicate content because you now technically have two identical pages with no indication as to which is the more important one.
Ok, your WordPress site should be configured to redirect HTTP to HTTPS, but you’ll still want to give this a test. Test your site thoroughly, and monitor your server logs and Google Search Console for any errors that may pop up.
