Rate this article: 
 (18 votes, average: 4.00)
(18 votes, average: 4.00) (18 votes, average: 4.00)Microsoft Visual Studio is a valuable tool that is capable of developing everything from software to websites. But with its popularity comes the risk of criminals and hackers taking advantage of our better nature by using it to design malware and other dangerous content.
That’s why code signing has become such an important part of software development. More and more, we’re seeing technology designed with a zero-trust model as a mechanism for security. This means the device or network will trust nothing and no one until it can authenticate. This approach definitely includes software. So, if you plan on developing anything with Visual Studio, you’re going to need to digitally sign it.
To side your Visual Studio software, you’re going to need to obtain a code signing certificate from a trusted certificate authority (CA). Before the CA will issue the code signing certificate for Visual Studio 2010 or any other version of the software, it’s going to need to vet you or your organization to ensure that you’re a legitimate entity and that everything is aboveboard. Provided you can satisfy the validation requirements, your certificate will be issued, and you’ll be able to install your Visual Studio code signing certificate on the server where you plan to do the signing.
You can often save a significant amount by buying your code signing certificate direct instead of through your a CA. We sell all Comodo code signing certificates, which work with Visual Studio, at up to 42% off.
Purchase Code Signing CertificatesCode signing is a mathematical process wherein a hash function takes place and a digital signature is affixed to the software. Code signing is a form of public key infrastructure (PKI), which means that a certificate is used to authenticate the party that left the signature. This is why we talk about code signing certificates and not just code signing keys.
When a piece of software is signed, the software itself and the code signing certificate are both hashed together. Hashing is a process in which data of any length can be mapped to a fixed length hash value of digest. No two disparate inputs can create the same hash value, which allows hashing to serve as checksum — indicating whether the software has been tampered with since it was signed. After the code and the certificate are hashed together, the developer uses its signing key to digitally sign the hash value.
When an end user attempts to download the software, they’ll also receive the certificate. It will use both to perform the same hash function that was performed when the signing occurred, then it will compare the hash values. Provided they match, the system will use the public key associated with the code signing certificate to verify the digital signature.
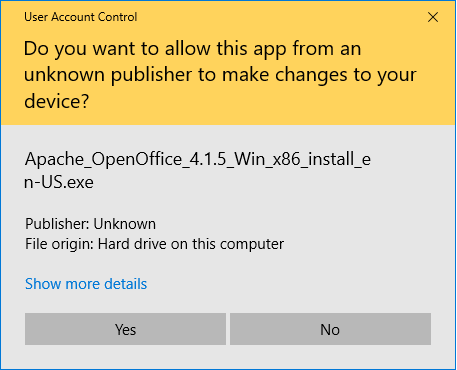
If there are no problems, everything goes off without a hitch. If there is a problem, the user will see this:
Updates. Update channels are a favorite attack vector for criminals. If you can compromise one, you can upload malware to any device that’s receiving updates. Code signing defends against this. So long as the signing key is never compromised, it can be used to sign software updates to ensure only updates from you, the trusted developer, make it on to the site.
It’s really not too difficult. Assuming you’ve already bought the certificate and installed it, all you need to do is:
Voila!
